You Probably Think This Post is About You

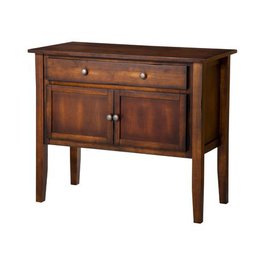
Howdy folks. This post is about vanity, but less of the staring longingly into the mirror kind, and more about what is sitting under that mirror. As part of the bathroom renovation process, I want to tell you how to convert a buffet or dresser into a vanity that will not only look great, but be functional. I searched for many moons to find the right “vanity” that would fit in our small bathroom, and it was no easy task. However, since most vanities cost several big face hundos (that is a few hundred dollars to those not in the “rap game”), I bought a tiny used buffet on Craigslist for $50, and it is something I highly recommend for renovating on a budget. The woman who sold it to me told me said that she had purchased it at a very fancy French boutique called Target (pronounced “Tar-jey,” with a soft “j,” like “jogging”), therefore I was able to find this “before” picture of it straight from the source:

The key to finding the right piece to fit in your bathroom is taking all dimensions into consideration. For example, we already had the glass vessel sink we would be using, therefore we needed the length and width to fit in the area, but we also needed the right height. After placing the vessel sink on many unsuspecting furniture victims in our house, and pretending to wash our hands, brush our teeth, etc., we were able to figure out a good height for the vanity, which was no taller than 30″ high. This baby just barely made the cut, and with its square-ish legs, we figured we could trim an inch off each one if we absolutely had to. (For those wondering, this gal didn’t get a name since I knew from the get-go that she would be staying with the house when we sell it at some point in the future.)

We laid solid teak flooring in the bathroom, and had a decent amount left over, so our plan was to paint the vanity white and create a new top for it with the leftover teak. Therefore, we broke it down into pieces, which was very difficult, and required The Boy’s expertise, since it was the type that every piece held the other parts on with those locking screws. If you have ever assembled Ikea furniture you will know what I mean! Imagine doing that task backwards with sweat dripping off your nose. I apologize to the screwdriver that briefly took flight. Once disassembled, we realized that building a new top would be very difficult, and would have to mirror the existing one precisely, to allow reassembly (holes in the spots, same width and depth, etc.).

First I sanded every piece with a rough grit sandpaper (nothing crazy, I believe it was 100 grit) to get through the gloss coat and allow primer to adhere. Then I primed each piece twice, and applied two coats of flat paint. This process took a small amount of work, but a lot of time due to allowing for drying in between each coat. After many brainstorming sessions about building the new teak top, and procrastinating, we were down to the wire to get this thing in place before my 30th birthday pool party. Thank goodness my brilliant and lovely friend Jessica again saved the day (see here where she helped us build a fence!). She witnessed the “how the heck are we gonna do this” conversation, and said, “Why don’t you just glue the teak to the existing top, and then put it all back together?” Well color me an idiot. I love that girl. Like I said, brilliant.

I quickly primed and painted the edges of the old top, since they would be visible. We had already built the new top by glueing each piece of teak to each other and clamping while they dried. We adhered the teak board to the old top using wood glue and a few screws going up from the bottom side (so that they were not visible from the top). The Boy is a fanatic about pre-drilling holes (i.e. drilling a small hole for the screw to go into), but I give him credit because it really does prevent the wood from splitting, which would have been disastrous.

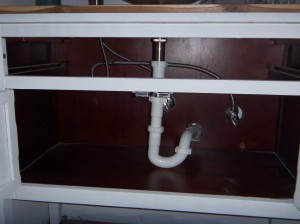
The Boy cut the necessary hole in the top for the vessel sink, and in the back of the vanity to accommodate for plumbing. I do not have any pictures of this process, so I cannot give a how-to tutorial, but we will be doing it again for our master bathroom, so I promise that an in-depth plumbing post is forthcoming. Here is the vanity in place, with the plumbing complete:

We left the doors and drawers off while we did that work, for obvious reasons. The most difficult part was altering the drawer to fit around the pipes, but even that wasn’t so difficult.

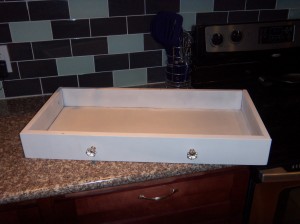
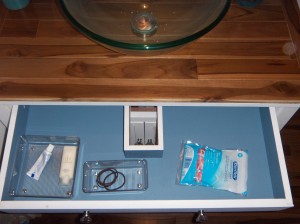
Here is the drawer (you will see that I found cute glass pulls at Home Depot for the doors and drawers):

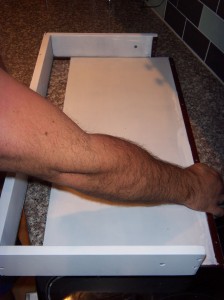
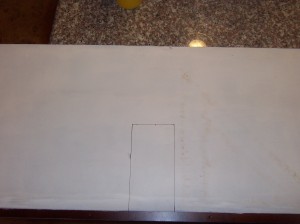
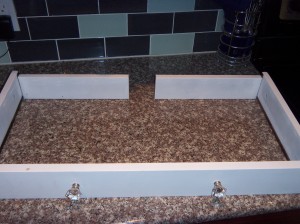
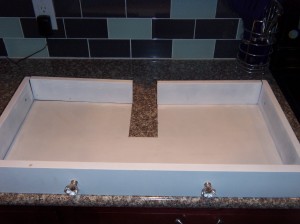
Next we removed the screws holding the back of the drawer on, and slid out the bottom. We measured how far back from the front of the vanity the pipe was, so we could measure from the front of the drawer and draw a mark on the bottom. We also knew that the pipe was in the middle of the vanity, so we gave generous room for the pipe’s width as well.

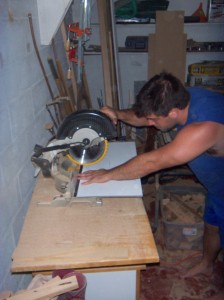
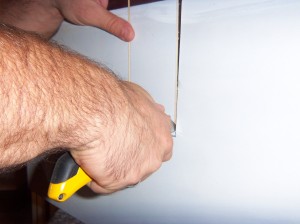
From there we cut on the long sides with our miter saw, but it couldn’t quite cut far enough, so we just scored the rest of the line, and the one going across, and snapped off the piece:

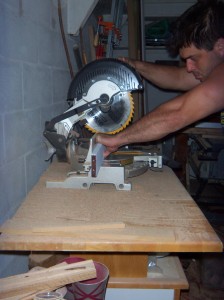
We also had to cut the back of the drawer, and for this we also used the miter saw:

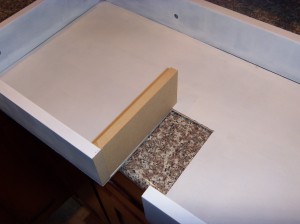
Once we had this we started to reassemble. Luckily we had some leftover MDF (medium density fiberboard) which was the same width as the outside pieces of the drawer, so we cut that into pieces to make side walls for the cut out portion.

We screwed the back pieces into place, and attached the MDF using wood glue and a finishing nail gun. Finally, I painted the inside of the drawer with a small amount of paint we had leftover, so it matches the accent wall in the bathroom. We attached the doors and slid the drawer into place. Voila!

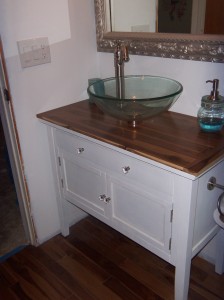
So there you have it!! We have a few finishing touches to put on the bathroom, such as a new door (it is hollow core, and off the main living area, so we want a solid core door for a little more privacy), trim around door, baseboards, quarter-round around the tub … and then we can cross it off the list as officially DONE.

(If you are wondering what is in the sink in this last picture, it is a remnant from some Pinbusting work that I did!)

Psst – I entered this post in a contest hosted by East Coast Creative – check it out!)

Let there be bathtub – and there was.

“Take out a shower, put in a tub.”  That was the plan.  It’s one of those things that sounds so much simpler than it turns out to be.  Between me and you, The Girl complicated things.  Did we get a regular ol’ free-standing tub?  Nope.  Did we get one that required a tub frame?  Yep.  Did the tub’s instructions explicitly state “NOT DESIGNED FOR OVERHEAD SHOWER USE?”  100% chance.  And then we installed an overead shower.  Believe it sister.

As per usual, The Girl and I had no previous tub installation experience.  We consulted The Dog, but her only response was to try to gnaw on our hands and beg for a treat.  Neither of which were particularly helpful.

I’m disguised as a dog that deserves a treat.

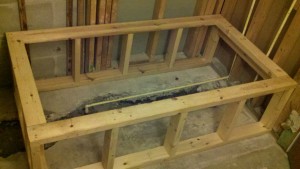
So I did my regular move, which The Girl will confirm consists mainly of staring at the instructions, drawing a lot of diagrams on scratch paper, reviewing the instructions, mumbling to myself, staring at the tub, measuring the 2x4s, and standing in the now demolished bathroom visualizing where the tub frame should go.  It’s not what I would call “exciting.”  But, after several hours of the regular move, I went ahead and cut the 2x4s.

Dang! That is some good craftsmanship!

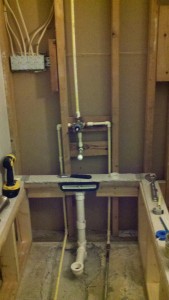
The frame actually turned out pretty well, and after dry fitting the tub (Bertha) seventeen times, we adhered the frame to the floor with liquid nails.  Then, more dry fitting of Bertha to make sure the plumbing was going to match up with the new drain.  Of course, all this dry fitting resulted in displeased looks from The Girl, but she stayed supportive.

Dry fit, remove, repeat. Ugh.

Let me just take a minute out to explain something.  The Girl and I are perfectionists.  This is NOT to say that we do everything perfectly (see the floor tile in the kitchen), but it DOES mean that we both stress out about doing things correctly.  When you have no idea what you’re doing, and the result has to be pretty close to perfect to avoid a catastrophic plumbing problem, there is a high degree of stress.  I can’t count the number of times that The Girl asked me “Is it supposed to look like that” or “Is that how you’re supposed to do it?”  And every time I responded with “Baby, I have absolutely no idea what I’m doing.”  I have found that it is better to just say “I’m dumb” up front, so there’s no surprise when whatever I’ve done is completely bassackwards.

Now, having adhered the tub frame, and convinced that the plumbing was lining up properly, we went ahead and mixed the concrete (two or three bags of quickrete I think) and poured it inside the frame, making sure that it encased the hot and cold water pipes.  Next, we put the pvc glue on the plumbing coming off of Bertha, and finally put Bertha into the frame, on top of the concrete bed, and connected the plumbing.

Where we made a mistake was in not filling Bertha with water to give her the necessary weight to settle into the concrete.  We did apply as much pressure as possible with our hands, but in hindsight we should have filled her with water.

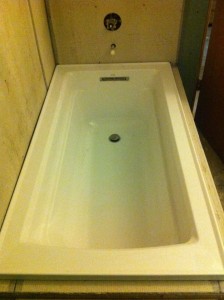
Did we do everything right?  Probably not.  What I DO know is that we haven’t had any plumbing leaks (yet).  And Bertha turned out flippin sweet after we put concrete backer board on the frame and tiled all around it.  Seriously, flippin sweet.

Untiled, but still flippin’ sweet.

The Girl and I have both bathed in Bertha, even showered (not designed for an overhead shower?  I beg to differ.  Stupid instructions.).  The Dog, however, is still limited to the green tub in the other bathroom – at least until she stops gnawing our hands or begging for treats and picks up a danged hammer once in a while.

Kitchen Renovation – Budget Breakdown

If you are disappointed that the title of the post is so straight-forward, to the point, and not at all witty, you are not alone.  I could not think of a good pun, and I wanted it to be obvious what this post was about, since many are curious about costs, especially in this economy.

As DIY television connoisseurs, The Boy and I are always astounded by how much money people spend on their renovations!  A $30,000 kitchen?  $18,000 for a master bath?!?  While it would be fabulous to buy everything on our dream list, and break the bank, we simply could not afford to do so.  Considering that our combined student loan debt is … whoa, I just got nauseous.  I can’t even type the number.  Let’s just say it is much larger than our mortgage.  Anyways, my point is, this is not a “Mr. and Miss Fancypants have unlimited funds” type of remodeling blog.  Nor is it a “We have disposable income” type of remodeling blog.  We scrimp and save and search high and low to find the best deals around so that we can afford to renovate.  Therefore, with no further ado, here is our budget breakdown for the kitchen remodel, as well as where we purchased the items from:

Cabinets:        $2,523.00  (a local, very small retailer, and the cabinets came flat-shipped, so we had to assemble AND install)

Appliances:    $2,500.00 (Sears Scratch and Dent store for most, Craigslist for matching microwave)

Flooring:         $550.00  (on close-out at Floor & Decor outlets, but we had to buy the entire remaining inventory, so we used the extra to tile the entryway, and we still have some tiles hanging out in the garage)

Lighting:          $170.00 (hanging light on clearance at Home Depot, recessed lights regular price at Home Depot)

Sink/Faucet:    $250.00 (sink on clearance at Home Depot, faucet from two fabulous men on Craigslist)

Granite:             $372.00 (on “special buy” at Floor & Decor)

Granite Install: $950.00 (a guy recommended by Floor & Decor)

Backsplash:      $171.23 (Floor & Decor)

Window:            $132.00 (Home Depot)

Plumber:            $500.00 (When we removed existing cabinets, we discovered a drain pipe running THROUGH the lower cabinets, so we paid plumber to come re-route and recess into wall – which, in hindsight, we could have done ourselves!)

GRAND TOTAL:  $8,118.23  (check my math – I’m a lawyer, not an accountant!)

The only cost possibly omitted is the drywall patching, and the only reason it isn’t included is that I could not break it down.  We had a contractor do a roof repair, and his guys did the drywall work, so it was all one price, and included drywall in both the living room and kitchen.

So there you have it!  You really can renovate your entire kitchen on a pretty tight budget.  If we had decent cabinets we could have painted, or existing appliances, or anything to work from, it would have been even less.  I will not pretend that it was easy, or that the deals just fell into my lap.  I spent a LOT of time researching and calling places, so be prepared to hunker down.  Any questions?  Bueller?